Dict Lab: A Serious Introduction to C
1 Overview
Most of the C programming you have seen to date pertains to memory representation of objects. In this lab, you will be using C as a full-featured language and implement a dictionary application. This project also introduces some topics that will be covered throughout the session (indicated using “Ch. X” in this text and referring to the chapters of our main textbook).
A sample usage of the dictionary application is as follows; in all the examples,
lines starting with $ denote the commands typed in the shell, and with >
those typed in dict, your program:
$ make
make[1]: Entering directory '/home/stu/dictlab/src'
gcc -g -Wall -Werror   -c -o dict.o dict.c
gcc -g -Wall -Werror   -c -o main.o main.c
gcc   dict.o main.o  -lmcheck  -o dict
make[1]: Leaving directory '/home/stu/dictlab/src'
$ src/dict
> put word:definition
> get word
definition
> put word:changed definition
> get word
changed definition
> del word
> get word

> CTRL-d
goodbye.
$
—Note
Typing CTRL-d signals to your program that the input that it is reading (from the “standard input”) has reached the end of file. Your program should end gracefully when reaching the end of the commands.This will rely on a dictionary library that you will implement. The above interaction corresponds to the following code with the library:
dict_t* dict = dict_create ();
dict_put ("word", "definition");
printf ("%s\n", dict_get ("word"));
dict_put ("word", "changed definition");
printf ("%s\n", dict_get ("word"));
dict_del ("word");
if (dict_get ("word") == NULL)
  printf ("\n");
dict_destroy (dict);
This project is divided into two parts:
- Part 1. You will be implementing a dictionary structure (storing pairs
key/value), and reading the user input to manipulate the structure. The
commands implemented in that stage are
put,get, anddel. It will be important not to leak any memory in these functions. - Part 2. You will add two more commands:
clr, which clears the dictionary, andsiz, which prints the size of the dictionary. Again,clrwill have to make sure not to leak any memory. You will also implement a destructor for your dictionary object.
2 Downloading the assignment
Start by extracting /home/zhuang/public/dictlab-handout.tar.bz2 in your home:
$ cd ~/
$ tar xvf /home/zhuang/public/dictlab-handout.tar.bz2
This will create a dictlab directory and unpack a number of files into the directory. /You
should only modify the files src/main.c and src/dict.c, and these are the
only files that are submitted./ The test folder contains the different tests
and grading examples for your program. Use the make command to compile your
code and the command make test to run the test driver. This would run all the
tests for all three parts, which is not really useful while working; see Section
6.2 for more finely grained testing options.
3 Structure of the project
There are two distinct aspects to that project, that are made clear by the fact
that you will code in two different files in the src/ folder: main.c and
dict.c. The file dict.c will implement a dictionary library, which
creates and manages a data structure for key/value pairs. The file main.c
will be in charge of providing the user interface: read the commands, execute
them using the dictionary library, and print the results to the user.
The two parts are independent in the sense that the library does not depend on
the user interface (it could be reused in other projects) and the user
interface could use any implementation of the library interface (spelled out in
dict.h which you are not allowed to modify). The file main.c is in no way
allowed to access the dictionary structure through any means other than the
library functions that you will implement.
The dictionary library will have to define a dictionary type dict_t and
implement the following functions (listed in dict.h and to be implemented in
dict.c):
// Create a dictionary.
dict_t* dict_create ();

// Free a dictionary.
void    dict_destroy (dict_t* dic);

// Put an element in a dictionary.  key is case sensitive, val is a string.  If
// the key already exists, its value is updated.  If val is NULL, the pair is
// deleted.
void    dict_put (dict_t* dic, const char* key, const char* val);

// Return the value associated with key, or NULL if none.
char*   dict_get (const dict_t* dic, const char* key);

// Delete the pair associated with key.
void    dict_del (dict_t* dic, const char* key);

// Return the size of the dict.
size_t  dict_size (const dict_t* dic);

// Delete all elements in a dictionary.
void    dict_clear (dict_t* dic);

// Apply fun to each pair key/val; arg is an extra argument passed to fun.
void    dict_apply (const dict_t* dic, const dict_apply_fun_t fun, void* arg);
The user interface, implement in main.c, starts with an empty dictionary and
will have to be able to interpret the following commands:
put KEY:VALUE: assignVALUEtoKEYin the dictionary.get KEY: return the value associated withKEY.del KEY: delete the pair associated withKEY.siz: print the size of the dictionary.clr: empty the dictionary.
4 Part 1: get, put, del
4.1 Dictionary library (dict.c)
In Part 1, you will have to implement the bulk of the dictionary library in
dict.c.
4.1.1 Dictionary structure
You will start by giving a definition for your main structure
struct dict. (You cannot change the name of this type, it is however aliased
(typedef’d) in dict.h as dict_t to avoid having to type struct each
time.)
For instance, you may want to have a dictionary implemented as a linked list; in that case, you can store the head of that list and its length in your structure:
struct dict {
    struct dict_list* head;
    size_t size;
};
The first field is a pointer (*) to the head of the list, that is, its
memory address. The struct dict_list itself contains the key, the value, and
the address of the next element in the list:
struct dict_list {
    char* key;
    char* val;
    struct dict_list* next;
};
The end of the list is signaled by having next be NULL.
—Note
The definition ofstruct dict_list should appear before struct dict since the latter
uses the former. C compilers read files from top to bottom and it is
sometimes forcing illogical presentation of the code—but there is a way out:
forward declarations. For example, let’s assume that you want your main
function to be at the top of your main.c file (it’s a matter of taste after
all). However, your main function uses say a function execute_command
which is also defined in main.c. To avoid having the code of
execute_command before main, you can simply indicate to the compiler that
there will be such a code later on. You do this by just repeating the
function’s type, with no code, before main:
// Forward declaration.
void execute_command (const char* cmd);

int main (int argc, char** argv) {
  ...
}

void execute_command (const char* cmd) {
  // Actual code
}
This is in fact what happens with C header files: they only contain the declarations of functions, but the code appears in other files. These forward declarations are further resolved during linking (Ch. 7).
4.1.2 dict_create
Equipped with these structures, start by implementing:
dict_t* dict_create ();
This function should allocate a new structure of type dict_t (aka struct
dict), initialize its members, and return the newly allocated structure. To do
so, you will call malloc to allocate a sufficient amount of memory:
dict_t* ret = malloc (sizeof (dict_t));
Then, you should initialize the fields of ret. Since ret is a pointer, to
access the object it points to, you should use *ret; hence the size field is
accessed using (*ret).size. C has a shorthand notation for this very common
construct:
ret->size = 0;
Now make sure to initialize head (since its value is garbage as it was just
allocated) and you are done and can return ret.
You will be implementing dict_destroy in Part 2; this is the function that
will be in charge of freeing the memory that was just allocated: in C, memory
that is malloc’d is never automatically freed. Memory allocation is the
topic of Ch. 9.
4.1.3 dict_get
Next, you will implement:
char* dict_get (const dict_t* dict, const char* key);
This function goes through the list given by dict. If you use the above
structure, this means starting at el = dict->head and checking each time
whether the key at el is key; if it is not, we set el = el->next, until
either key is found, or we reach el == NULL.
To compare key with el->key, we need to compare one by one each character in
key with those in el->key. Remember that strings in C are just pointers
(memory addresses) to the first character in the string, so comparing el->key
== key will not do what you want. So how do you even get the length of a
string s? You would start at memory location s and advance as long as the
byte at s (i.e. *s) is not the end-of-string marker (\0, the NULL
character). This can get a bit messy, so luckily, you are allowed to use the
string comparison function strcmp(3) provided by the standard library:
strcmp (s1, s2): returns 0 iffs1ands2are the same strings. Hence inif (strcmp (s1, s2))..., the condition holds if the strings are different—be careful.
If key is found, return the corresponding value; otherwise, return NULL.
—Note
You will remark that the type of the argumentdict is not simply dict_t* but
const dict_t*. This is used to indicate to the compiler that the function
dict_get guarantees that it won’t modify the contents of dict (that is,
*dict). These indications are crucial to providing clear contracts to the
user, helping the compiler make correct assumptions, and avoiding modifying
objects you did not intend to modify.
4.1.4 dict_put
It is now time for:
void dict_put (dict_t* dict, const char* key, const char* val);
This function stores the pair key / val in the dictionary dict, possibly
erasing the previous value associated with key.
It should make private copies of key and val as required. This means that
the function cannot use, for instance, my_element->val = val. To make a copy
of a string s, one could:
- allocate
strlen(s) + 1bytes usingmalloc(3)(strlen(3)returns the length of a string, not counting the end-of-string marker) - go through the
strlen(s) + 1bytes ofsand copy each byte, using either a loop or the functionmemcpy(3)
Again, the standard library provides a function for this:
strdup(3)—remember that since its return value was malloc’d, it
needs to be free’d.
The function works as follows:
- If
keyis found indict, then the associated value should be freed and replaced by a copy ofval. - If
keyis not found indict, then a new element is added to the list; that element’s key is a copy ofkeyand its value is a copy ofval.
4.1.5 dict_del
Finally, you should implement:
void dict_del (dict_t* dict, const char* key);
This function goes through dict searching for key, if it finds it, it should
delete the corresponding key/value pair. The memory allocated for the element
and its key/value pair should be free’d. If the key does not exist, this
function does nothing.
4.2 User interface (main.c)
The main function will contain the main loop of your program and should behave
like this:
- Create an empty dictionary
- Print
"> "on the standard output (this is important). - Read the command from the user; the first three characters are the command
name, then a space, then the arguments, and a newline character
\n. - If the command is unknown, exit.
- If end-of-file was read (EOF), destroy the dictionary, print "goodbye." followed by a newline and exit.
- Otherwise, execute the corresponding command and go back to 2.
To read from the standard input, you will be using the stream reading functions
from the standard library, with stream being stdin, a variable defined in
<stdio.h>:
int fgetc(FILE* stream): read one character of the given stream. This returns the constantEOFon end of file.char* fgets (char* s, int size, FILE* stream): read in at most one less thansizechars fromstreamand stores them into the buffer pointed to bys. Reading stops after an EOF or a newline. If a newline is read, it is stored into the buffer. A terminating null byte (\0) is stored after the last character.
The function fgets is a bit tricky to work with when you want to read a whole
line. Indeed, if the line is very long, fgets needs to be called multiple
times. A video aside for this lab walks you through implementing a robust
“readline” function.
To write to the standard output, you will be using printf(3).
—Note
All thesef* functions are buffered: since actually reading and writing to
a file is very costly (it requires a system call, Ch. 8), these actions are
done in temporary buffers in memory, and system calls are made only when needed
(buffer full when writing, buffer empty when reading). We will see more about
buffering in Ch. 10. Let us simply note the two following consequences of
using buffered input/output:
- Calling
fgetcmultiple times to get a full line is nearly as efficient as callingfgets. - Writing is done to a temporary buffer and is actually sent (flushed) to the
stream (e.g.,
stdout) when the buffer is full orfflush (stream)is called. You need not worry about this for this lab, since you will be interacting with the program on a terminal, where flushing is automatically done after each call toprintf(3). To emulate this, the driver calls your program withstdbuf(1)to disable buffering. If it weren’t doing this, the driver would be stuck trying to read data thatdictwould have stored in a buffer, but not flushed.
4.2.1 Commands
The three commands to be implemented in this part are:
get KEY: print the value associated withKEYfollowed by a newline\n. If no such value exists, a blank line is printed.put KEY:VALUE: store the pairKEY/VALUE. Note that bothKEYandVALUEcan be arbitrary strings, with the only guarantee being thatKEYdoes not contain a colon. Additionally, these strings don’t contain a newline\n. Nothing is printed in return.del KEY: delete the pair associated withKEY, if it exists. Nothing is printed in return, even if the key does not exist in the dictionary.
5 Part 2: clr, siz
5.1 Dictionary library (dict.c)
5.1.1 dict_clear
You will implement the function:
void dict_clear (dict_t* dict);
This function clears the dictionary dict, destroying each pair key/value, but
does not destroy dict itself (remember that dict was allocated using
dict_create, so it will need to be freed at some point, but this is not this
function’s job.)
In practice, if you use a linked-list implementation, you will start at
dict->head and free each key and val, then free the dict_list
object itself, before going to the next element. It is strongly recommended
that you do not implement this recursively. By saving the next pointer
before freeing the element, you will make sure that you are not trying to access
a field in a destroyed variable.
—Note
When youfree a memory location, the memory is usually not overwritten, but
simply put in a pool of “available” memory. This means that if you try to
access that memory, your data is usually still there. This may hide bugs and
create very random crashes. To avoid this, your program is compiled with
-lmcheck; as a result, a different implementation of malloc and free is
used which makes sure that your program crashes if you try to access a memory
location that has been freed. We will see more of this in Ch. 9.
5.1.2 dict_destroy
This is now the function that frees (destroys) a dictionary:
void dict_destroy (dict_t* dict);
This operates just as dict_clear, but in addition should free the memory that
was allocated during dict_create. After a call to this function, if any other
library function receives the pointer dict, the behavior is undefined (most
likely, it will crash).
—Note
You may be tempted to setdict to NULL at the end of that function, hoping
that this will make it clear to the user that the pointer is now invalid.
However, changing the value of dict in dict_destroy will have no impact on
the value of dict outside of the function. This is because in C, arguments
are always passed by value, that is, the value of the argument is copied when
making the call. This is also why we never pass a struct as argument to a
function: we want to avoid copying the whole structure when making the call.
Additionally, passing a pointer to a struct allows the called function to
modify the fields in a way that the caller will see.
5.1.3 dict_size
This simple function returns the current size of the dictionary:
size_t dict_size (const dict_t* dict);
—Note
The typesize_t is a standard alias for unsigned long, that is, a 64-bit
unsigned integer type. It is defined in the header file stddef.h, which is
included by most standard headers (e.g., unistd.h, stdio.h, …).
5.2 User interface (main.c)
Two new commands should now be made available:
clr: clear the dictionary. Nothing is printed in return.siz: print the current size of the dictionary.
The only difficulty here is that your previous commands had argument(s), while these two have none. Here is an example run:
$ src/dict
> put a:b
> siz
1
> put a:c
> siz
1
> get a
c
> clr
> siz
0
> get a

>
Also, now that dict_destroy is available, your program is expected to call it
when finishing treating the input. Consequently, your program should have no
memory leaks.
6 Evaluation
6.1 Points
The dictlab is graded as follows:
- Basic: 210 points, basic test on Part 1 and 2
- Part 1: 60 points, comprehensive test on Part 1
- Part 2: 30 points, comprehensive test on Part 2, 6 of which are for lack of memory leaks
6.2 Driver
This project is evaluated by a test driver. You can run the full driver by
typing, at the root of your project, i.e. dictlab:
$ make test
For each test, the driver prints what is the command executed. For instance, the command:
$ ../src/dict < ./traces/short-P1-01.txt
runs ../src/dict and executes the commands found in
./traces/short-P1-01.txt.
The result, for each test, is readily printed; in bracket, there’s a shorthand notation for the result:
OK: Test passedKO: Test failed, yourdictprinted something unexpectedTO: Time out, yourdicttook too long to answer, it’s usually caused by an infinite loop. See Section GDB for more on how to debug time outs.MM: Memory problem, yourdictmade an illegal memory access (or other similar errors, as printed.) Valgrind will list the line in which the problem occurred. See Section Valgrind for more on Valgrind on how to debug memory problems.
—Note
The driver is executed from thetest directory, hence to access the dict
executable, it needs to call it as ../src/dict, which means “go to the parent
directory, then to the src directory, then find dict.”
—Note
The driver uses commands found in a text file. To provide them todict, it
replaces the standard input of dict with the file. This is done, in a shell,
using the redirection <. For instance, the program cat(1) reads
files passed as argument and
prints them as-is. If no argument is provided, cat will read from its
standard input:
$ cat
hello  ← typed by user
hello  ← printed by cat
CTRL-d
$
Hence using cat /tmp/test.txt and cat < /tmp/test.txt do exactly the same
thing: they print /tmp/test.txt. In the first case, cat reads the file
provided as argument, in the second, the shell redirects the contents of
/tmp/test.txt to the standard input of cat. We will see how the shell does
this in Ch. 10. Can you guess what cat /dev/stdin < /tmp/test.txt do?
7 Tools
7.1 GDB
You should be fairly familiar with GDB at this point, but here are a few tips.
Run your program with arguments or with a redirection:
(gdb) r arg1 arg2 < file1
This will run your program with arguments
arg1 arg2and replace the standard input withfile1. To silence the output of your program, you can add> /dev/nullto that command line.Print variables:
(gdb) p *dict
$1 = {head = 0x0, size = 0}
(gdb) p dict->size
$2 = 0
The command
pcan print a lot of objects. It is not limited to variables, as you can call functions with arguments:(gdb) p (int) strlen ("lorem") $3 = 5Put/delete/list breakpoints:
(gdb) b main
Breakpoint 1 at 0x1150: file main.c, line 63.
(gdb) b main.c:77
Breakpoint 2 at 0x1276: file main.c, line 77.
(gdb) d 2
(gdb) info b
Num     Type           Disp Enb Address            What
1       breakpoint     keep y   0x0000000000001150 in main at main.c:63
Continue from a break point:
Breakpoint 1, main (argc=1, argv=0x7fffffffe078) at main.c:63
63      int main (int argc, char** argv) {
(gdb) c
With a numeric argument,
cwill skip the next crossings:(gdb) c 3 Will ignore next 2 crossings of breakpoint 1. Continuing.
The command
untilcan be used to continue until a certain line is reached:(gdb) until main.c:72 main (argc=<optimized out>, argv=<optimized out>) at main.c:72
Stepping into/over, finishing a call:
Breakpoint 5, cmd_del (dict=0x55555555a2f0) at main.c:151
151       dict_del (dict, del_arg);
(gdb) s
dict_del (dic=0x55555555a2f0, key=0x55555555abc0 "x") at dict.c:275
The command
ssteps into a call.Breakpoint 5, cmd_del (dict=0x55555555a2f0) at main.c:151 151 dict_del (dict, del_arg); (gdb) n 152 free (del_arg);
The command
nsteps over calls. When in a function, the commandfinishcompletes the call, hencesfollowed byfinishis the same asn:Breakpoint 5, cmd_del (dict=0x55555555a2f0) at main.c:151 151 dict_del (dict, del_arg); (gdb) s dict_del (dic=0x55555555a2f0, key=0x55555555abc0 "x") at dict.c:275 275 dict_list_t* el = dict_find_elt (dic, key); (gdb) finish Run till exit from #0 dict_del (dic=0x55555555a2f0, key=0x55555555abc0 "x") at dict.c:275 cmd_del (dict=0x55555555a2f0) at main.c:152 152 free (del_arg);
Looking up and down the call stack:
Breakpoint 5, cmd_del (dict=0x55555555a2f0) at main.c:151
151       dict_del (dict, del_arg);
(gdb) s
dict_del (dic=0x55555555a2f0, key=0x55555555abc0 "x") at dict.c:275
275       dict_list_t* el = dict_find_elt (dic, key);
(gdb) bt
#0  dict_del (dic=0x55555555a2f0, key=0x55555555abc0 "x") at dict.c:275
#1  0x00005555555559ab in cmd_del (dict=0x55555555a2f0) at main.c:151
#2  0x0000555555555276 in main (argc=<optimized out>, argv=<optimized out>) at main.c:75
(gdb) up
#1  0x00005555555559ab in cmd_del (dict=0x55555555a2f0) at main.c:151
151       dict_del (dict, del_arg);
(gdb) down
#0  dict_del (dic=0x55555555a2f0, key=0x55555555abc0 "x") at dict.c:275
275       dict_list_t* el = dict_find_elt (dic, key);
In this example, we first step into
dict_del, then print the call stack (btstanding for backtrace). Then we move around the call stack usingupanddown; note that this does not change the current instruction, we are just visiting the call stack.History: Use the Up and Down arrow keys to navigate your history, which is persistent across sessions. To search for something you typed recently, hit CTRL-r:
(gdb) r very long command line carefully crafted < input > output
   ...
(gdb) CTRL-r and typing "r v"
(reverse-i-search)`r v': r very long command line carefully crafted < input > output
Graphical interface. That’s right, GDB has a very nice user interface:
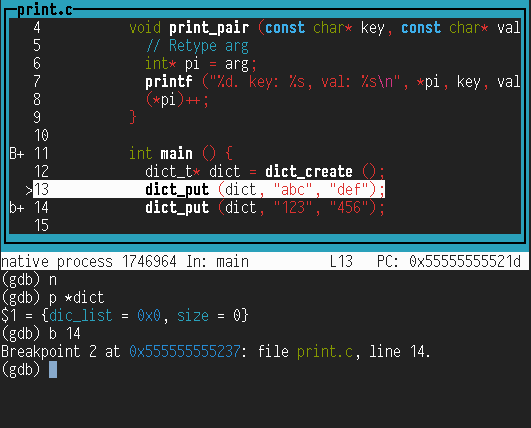
To access the interface, type
tui enable(tuistands for Text User Interface). In that mode, the arrow keys move up and down the code, while CTRL-p and CTRL-n behave like your usual history keys. If you print things in your program, this will garble the output of GDB; you can either refresh the GDB window by typing CTRL-l, or run your program with> /dev/null(see first GDB tip).
You can run your code with a long trace, but in GDB. You can then stop GDB using CTRL-c, and see where it is stuck:
$ make test
* PART 1
[TO] ../src/dict < /home/zhuang/.../traces/grading-P1-01.txt
CTRL-c
$ gdb src/dict
(gdb) r < /home/zhuang/.../traces/grading-P1-01.txt > /dev/null
  CTRL-c
(gdb) bt
7.2 Valgrind
valgrind(1) is a complete suite of tools for debugging and profiling
programs. Out of the box, valgrind checks whether a given program makes
illegal memory accesses or leaks memory. To use it like that, we simply prefix
the command line with valgrind. Consider the following program:
int main () {
  char *s = malloc (10);
  s[10] = 'a';
}
This program has two problems: It doesn’t free the allocated memory and it does
an illegal memory access (s[10] being out of bound). Valgrind clearly reports
this:
$ gcc -g leak.c -o leak
$ valgrind ./leak
==1669915== Memcheck, a memory error detector
==1669915== Copyright (C) 2002-2017, and GNU GPL'd, by Julian Seward et al.
==1669915== Using Valgrind-3.16.1 and LibVEX; rerun with -h for copyright info
==1669915== Command: ./leak
==1669915==
==1669915== Invalid write of size 1
==1669915==    at 0x109157: main (leak.c:3)
==1669915==  Address 0x4a5b04a is 0 bytes after a block of size 10 alloc'd
==1669915==    at 0x483A77F: malloc (vg_replace_malloc.c:307)
==1669915==    by 0x10914A: main (leak.c:2)
==1669915==
==1669915==
==1669915== HEAP SUMMARY:
==1669915==     in use at exit: 10 bytes in 1 blocks
==1669915==   total heap usage: 1 allocs, 0 frees, 10 bytes allocated
==1669915==
==1669915== LEAK SUMMARY:
==1669915==    definitely lost: 10 bytes in 1 blocks
==1669915==    indirectly lost: 0 bytes in 0 blocks
==1669915==      possibly lost: 0 bytes in 0 blocks
==1669915==    still reachable: 0 bytes in 0 blocks
==1669915==         suppressed: 0 bytes in 0 blocks
==1669915== Rerun with --leak-check=full to see details of leaked memory
==1669915==
==1669915== For lists of detected and suppressed errors, rerun with: -s
==1669915== ERROR SUMMARY: 1 errors from 1 contexts (suppressed: 0 from 0)
The test driver will use Valgrind to check that you correctly free your memory.
Valgrind can help you track very precisely where the leaked memory was
allocated, using the option --leak-check=full:
$ valgrind --leak-check=full ./leak
...
==67107== 10 bytes in 1 blocks are definitely lost in loss record 1 of 1
==67107==    at 0x483A77F: malloc (vg_replace_malloc.c:307)
==67107==    by 0x10914A: main (leak.c:2)
...
As the driver uses Valgrind to run your program, it will uncover wrong memory
accesses that could well not appear when you run your program yourself—out of
sheer (un)luck! If a test fails with the MM code, a Valgrind trace is printed
showing where you made an illegal memory access. To reproduce this, you could
run Valgrind yourself:
$ make test
...
[MM] ../src/dict < /home/zhuang/dictlab-grading/traces/grading-P1-01.txt
    ==2394868== Invalid read of size 1
...
$ cd test
$ valgrind ../src/dict < /home/zhuang/dictlab-grading/traces/grading-P1-01.txt > /dev/null
==2399692== Memcheck, a memory error detector
==2399692== Copyright (C) 2002-2017, and GNU GPL'd, by Julian Seward et al.
==2399692== Using Valgrind-3.16.1 and LibVEX; rerun with -h for copyright info
==2399692== Command: ../src/dict
==2399692==
==2399692== Invalid read of size 1
==2399692==    at 0x4F95B50: __strcmp_avx2 (in /usr/lib64/libc-2.28.so)
==2399692==    by 0x400BE7: dict_get (dict.c:56)
==2399692==    by 0x400DD5: main (main.c:18)
==2399692==  Address 0x5237e00 is 0 bytes inside a block of size 506 free'd
==2399692==    at 0x4C31F94: free (vg_replace_malloc.c:538)
==2399692==    by 0x400C5F: dict_del (dict.c:69)
==2399692==    by 0x400EDD: main (main.c:39)
==2399692==  Block was alloc'd at
==2399692==    at 0x4C30DE7: malloc (vg_replace_malloc.c:307)
==2399692==    by 0x4EC61AD: strdup (in /usr/lib64/libc-2.28.so)
==2399692==    by 0x400B63: dict_put (dict.c:44)
==2399692==    by 0x400E9F: main (main.c:33)